This chapter contains the following topics:
Manual Distributions to General Ledger
Printing and Posting Adjustments
You use the Adjustments selection to enter adjustments, print an adjustment edit list, and post adjustments to other files or tables.
Adjustments include entries for hand-written checks, corrections to previously printed payroll checks, adjustments to quarter-to-date and year-to-date figures, and adjustments to distributions.
An adjustment does not result in a check generated by the computer, although an adjustment can be used after the fact to enter a hand-written check into the system.
| • | You can use an adjustment to correct a computer-generated check after it has been printed and posted, so long as the amount of the check has not changed. This might be the case if a deduction had mistakenly been assigned to the wrong account. |
| • | If you discover an error in a check before it is printed (by reviewing the edit list, for instance), do not use this selection to correct it. Instead use Time worked to correct the error before printing the check. |
| • | You can use a single Adjustments entry to correct systematic errors to your payroll spread out over many checks — for instance, after having introduced a new deduction code two weeks ago you might only now discover that you have mistakenly assigned it the wrong account number. |
| • | You can use adjustments to void Direct Deposit payments, however there is no reversal ACH file generated. |
This function does not automatically calculate the various gross amounts, taxes, and voluntary deductions for a paycheck. Each of these items must be entered individually.
The software calculates default values for certain fields where possible. If you decide to accept a calculated default amount, you must be sure that it is the correct amount for the field.
One of the last fields to be entered is Net pay. The software uses this field to cross-check the arithmetic of the adjustment transaction. The software calculates its own value for net pay based on the amounts entered for pay, taxes, and voluntary deductions. If the entered net pay does not match the calculated net pay, the software will not let you end the entry until the entered amount matches the calculated net pay.
Adjustments, like the checks themselves, do not take effect immediately. They must be posted, and until posted they can be changed and deleted.
When Payroll is in setup mode, you are not asked to enter distributions. Once you have switched Payroll into its normal mode for day-to-day operations, you can then enter distributions for adjustment transactions.
The decision of whether to enter distributions depends on the setting of the Distribute wages ? flag in Control information and the setting of the corresponding flag for each employee. If you have entered distributions for an adjustment and later change regular hours or pay, overtime hours or pay, or special hours or pay, you must change the distributions until all the hours and pay are distributed.
|
Note |
If you are using the Payroll module with the Passport Business Solutions Job Cost module, all employees whose wages are applied to jobs must have the Distribute wages (manually) question checked in Employees. |
Year-end considerations
Even after printing W-2’s and 1099’s, you are allowed to enter time transactions and to print and post checks. You can do this up to the end of the first quarter of the new year.
For example, assume the year just ended is 2020 and the new year is 2021. In this case, Control information specifies that the current payroll year is 2020. Transactions dated in 2020 can be entered and posted. Transactions dated in the first quarter of 2021 can also be entered and posted. Transactions dated before 2020 or after the first quarter of 2021, (i.e. after March 31st), cannot be entered and posted.
When Close a year is run using this example, the quarterly data for 2020 and the year-to-date data for 2020 are purged, and any data already posted for the first quarter of 2021 is made available for reporting. The current payroll year in the control information is updated to 21 from 20.
Select
Enter from the Adjustments menu.
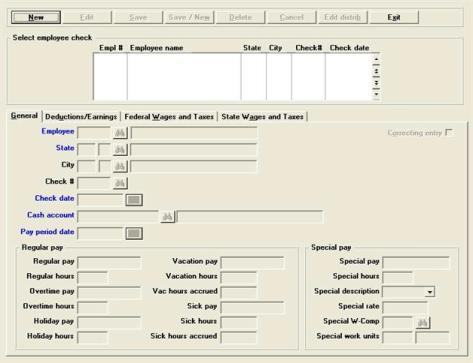
Adjustment screens strongly resemble Time worked screens.
Graphical Mode
The following screen displays:
The General tab displays first. You may select any tab.
The list box displays up to 6 existing adjustments at a time. You may sort the adjustments by employee number in ascending or descending order. Only columns with red labels may be sorted. To select a field or change the sort order, click on the column name or the arrow to the right of the column name or use the View options.
To locate an adjustment, start typing the employee number. You may also use the up/down arrows, Page up, Page down, Home and End keys to locate an adjustment. The <F1> and <SF1> keys function the same as the up/down arrow keys.
Adjustments that display in the list box are available for changes or deletion. The fields for the selected adjustment display in the lower part of the screen.
When an adjustment is found, you may select the <Enter> key or Edit button to start editing.
You may click on a button or enter the keyboard equivalent for adding, editing, deleting or canceling a new adjustment:
| Button | Keyboard | Description |
|
New |
Alt+n |
To enter a new adjustment |
|
Delete |
Alt+d |
To delete the adjustment selected in the list box. You may also use the <F3> key |
|
Edit |
Alt+e |
To edit the adjustment selected in the list box |
|
Save |
Alt+s |
To save a new adjustment or changes to an edited adjustment |
|
Save/New |
Alt+w |
Same as Save button plus the New button |
|
Cancel |
Alt+c |
To cancel adding or editing an adjustment |
|
Edit Distrib |
Alt+b |
To edit the distributions for an existing adjustment. See the Manual Distributions to General Ledger section for more information on distributions |
|
Exit |
Alt+x |
To exit the screen. You may also use the <Esc> key |
From the menu selections, you have two options:
You may select Options > Post to post the adjustments.
You may select Print > Edit list to print a list of adjustments.
Character Mode
In character mode, the following screen displays.
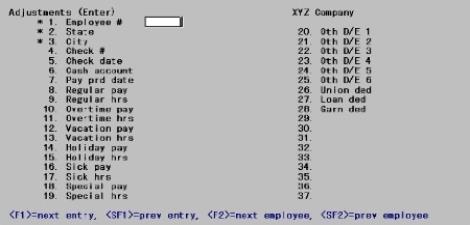
From this screen you can work with both new and existing adjustments. If an adjustment has already been made for the employee you specify, it displays and is available for changes or deletion.
Enter the following information:
If the employee whose number you entered is terminated, you have the choice of entering the adjustment anyway.
|
Format |
999999 |
|
Example |
Type 5 |
Follow the screen instructions to make any changes.
If the adjustment includes manual distributions, you are asked if you want to modify those. If so, at the distribution screen you can select existing distributions in order by pressing <F1>. You can enter new values for the hours, rate, and amount fields.
If this is a multi-city/state employee (so designated in Multi-city/state field of the selection Employees), enter the State Tax Code. This must already have been defined for this employee (either as his primary state or as one of the other states to which he is liable for taxes). The code entered for the primary state is the default and displays if you press <Enter>.
Otherwise, this field is filled automatically from the Employees entry for this employee.
|
Format |
Two letters (state) One character (tax table) |
|
Example |
(displayed automatically in this example) |
If this is a multi-city/state employee (so designated in Multi-city/state field of the menu selection Employees), enter the City Tax Code. This must already have been defined for this employee (either as his primary city or as one of the other municipalities to which he is liable for taxes). The code entered for the primary city is the default and displays if you press <Enter>.
Otherwise, this field is filled automatically from the Employees entry for this employee.
|
Format |
Two letters (city) One character (tax table) |
|
Example |
(displayed automatically in this example) |
This field may not be accessible on your system. For a setup that allows access, see the Pennsylvania Act-32 appendix.
Enter the working jurisdiction code.
|
Format |
99999999999 |
|
Example |
Can not be entered per the PR Control information setup |
You are not required to enter a check number, since not all adjustments involve checks. However, unless a check number is entered the net pay amount of this entry can only be zero.
If a check number is entered, it is assumed to be the number of a check which you hand-wrote to pay the adjustment and are now entering into the computer. There is no conflict in the Payroll module if the employee actually has an existing check with the same number. This feature allows you to hand-write a change to an existing check after printing it but before issuing it to the employee.
Options
For adjustments to amounts on file (e.g. QTD figures) or G/L distributions where no change in pay is involved, you can use a check number of 0. Alternatively, you can enter your own identification number.
|
<F1> |
For the next entry for this employee |
|
<SF1> |
For the previous entry for this employee |
|
Format |
999999 |
|
Example |
Type 112 |
This is the date used when recording this adjustment in Quarter-to-date History and Payroll Distribution to G/L.
For the first adjustment, the current date is the default and can be selected by pressing <Enter>. For subsequent adjustments in this session, the date of the adjustment becomes the default for the next.
Enter the date of the adjustment. If you have an entry in the Check # field, this date should be the date of the check.
Options
You may also use the option:
|
<F4> |
To select a date using the calendar lookup |
|
Format |
MMDDYY |
|
Example |
Type 031505 |
Options
Enter the cash account applicable for this adjustment. This must already have been defined in the Cash accounts selection of the System Manager module. You can use one of the options:
|
<F1> |
For the next cash account on file. The <F1> and <SF1> options do not appear if only one cash account has been defined. |
|
<SF1> |
For the previous cash account on file |
|
<F2> |
For the default cash account in Control information |
|
Format |
Your standard account number format, as defined in Company information |
|
Example |
Press <F2> |
Options
Enter the pay period ending date or use the option:
|
<Enter> |
For the date entered for the check date |
|
<F4> |
To select a date from the date lookup |
|
Format |
MMDDYY |
|
Example |
Type 31405 |
Regular Pay
Enter the amount of regular pay or salary for this adjustment.
You cannot enter regular pay and special pay on the same screen. Special pay must be on its own adjustment.
|
Format |
99999999.99- |
|
Example |
Type 2500 |
Enter the regular hours worked. You can press <Enter> to use zero.
|
Format |
999.99- |
|
Example |
Type 40 |
If you enter a non-zero number here for a salaried employee, you can distribute to G/L accounts by hours instead of by percentages of salary. (Refer to the section for the third screen in this chapter.)
Enter the overtime pay. You can press <Enter> to use zero.
|
Format |
999999.99- |
|
Example |
Press <Enter> |
Enter the overtime hours worked.
|
Format |
999.99- |
|
Example |
Press <Enter> |
Enter the amount of holiday pay.
|
Format |
999999.99- |
|
Example |
Press <Enter> |
Enter the amount of holiday hours.
|
Format |
999.99 |
|
Example |
Press <Enter> |
Enter the amount of vacation pay.
|
Format |
999999.99- |
|
Example |
Press <Enter> |
Enter the amount of vacation hours.
Vacation hours are checked against the amounts in Employees. A warning message displays if the hours entered here are greater than what the employee has available, but the hours are accepted.
|
Format |
999.99- |
|
Example |
Press <Enter> |
Enter the amount of sick pay.
|
Format |
999999.99- |
|
Example |
Press <Enter> |
Enter the sick hours (hours of sick pay taken).
Sick pay hours are checked against the amounts in Employees. A warning message displays if the hours entered here are greater than what the employee has available, but the hours are accepted.
|
Format |
999.99- |
|
Example |
Press <Enter> |
Special Pay
This is a calculated field, based on special hours (F`ield #19) as well as the special pay rate. Data cannot be entered/changed into this field.
|
Format |
999999.99- |
|
Example |
Press <Enter> |
Enter the number of hours worked at the special pay rate.
You cannot enter regular pay and special pay on the same screen.
Using character mode, when you press <Enter>, a data entry window will appear enabling you to select pre-defined special pay options (from the Employee Record), or to enter one on-the-fly using the OTHER option.
Using graphical mode, enter the Special description field. You may use the drop down list options. These are from the employee record. You may also enter any special pay description.
When you press <Enter>, the field Special pay will automatically be calculated for you.
|
Format |
999.99- |
|
Example |
Press <Enter> |
This is the Deductions/Earnings tab.
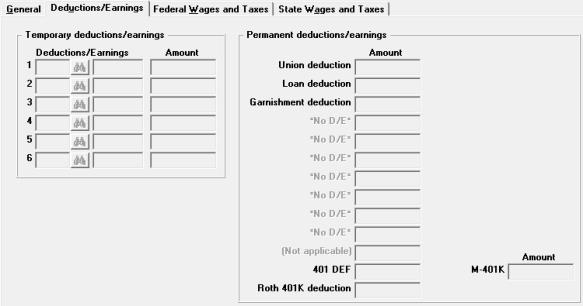
Temporary deductions/earnings
These fields correspond to the temporary deduction/earning codes that you can enter for Time worked transactions.
In each field, enter the appropriate deduction/earning code, or leave it blank to not use this field. The code if entered must be a valid code already present in Deduction/earnings.
|
Format |
Three characters |
|
Example |
Press <Enter> at each field to skip all of them |
If you entered a code in the previous field, enter the dollar amount here. Note that this field (unlike the corresponding field in Time worked) may be negative because this is an adjustment.
|
Format |
99999.99- |
|
Example |
(Does not appear in this example.) |
Enter the amount of any union deduction. Entering any union deduction is permitted only if the employee’s record in Employees contains a valid union deduction account number.
|
Format |
999999.99- |
|
Example |
This field is skipped, since this employee does not have a union deduction or a union deduction account number. |
Enter the amount of any loan payment deducted from the employee’s pay.
|
Format |
999999.99- |
|
Example |
Press <Enter> |
Enter the amount of any garnish deduction taken from the employee’s pay.
|
Format |
999999.99- |
|
Example |
Press <Enter> |
(permanent deductions/earnings)
In these nine fields, the program displays the descriptions of any permanent deductions/earnings for this employee in Employees. Any fields that are marked with *NO D/E* are skipped.
In each field that has a valid permanent deduction/earning taken from Employees, you can enter a deduction/earning amount.
When the deduction is a special tax (type X), the basis for the deduction displays at the bottom of the screen.
If the employee has direct deposit, the second to the last field can not be entered.
If the employee has a 401(k), the last field is not available for this purpose and is described separately below.
|
Format |
999999.99- at each field |
|
Example |
For employee number 3, no permanent deduction/ earnings are entered in Employees. Fields #29 through 37 are marked *NO D/E* and skipped. |
M-401k and
Roth 401K deduction
If the employee does not have a 401(k) plan, this field is available for permanent deductions / earnings as described above.
Otherwise, enter the amounts for the employee’s regular 401(k) contribution Roth 401(k) contribution and the employer’s 401(k) contribution.
|
Format |
999999.99- |
|
Example |
Press <Enter> through each field |
Character Mode
Options
Make any needed changes and then press <Enter>. If this is an existing entry, you can also use the option:
|
<F3> |
To delete this entry |
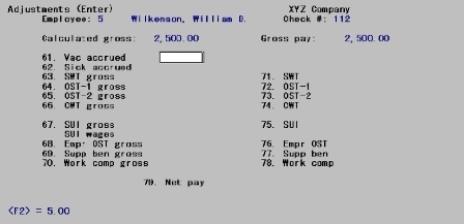
The second screen for adjustments displays:
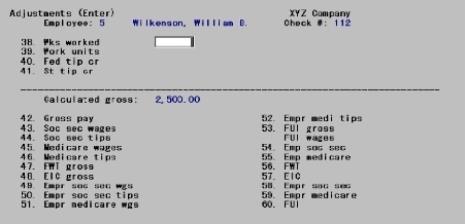
If this is an existing entry, or if this is a new entry and you have reached this point by backing up from a later screen using the <F1> feature, the information already on file is displayed and the cursor is positioned at Field number to change ?. Otherwise the cursor is initially in the Wks worked field.
This is the Federal Wages and Taxes tab:
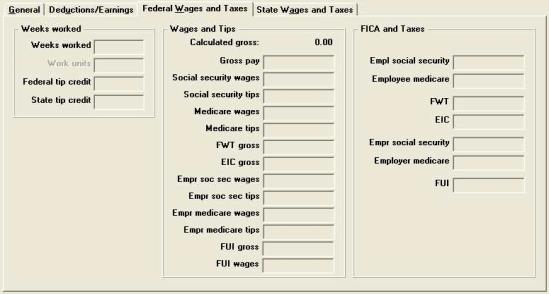
Enter the fields on this tab.
Weeks worked
Enter the number of weeks worked by this employee.
|
Format |
99.99- |
|
Example |
Type 2 |
In states where workers’ compensation premiums are based on work units, or special tax (type X) deductions are based on work units, enter the number of work units applicable to this adjustment.
|
Format |
999.99- |
|
Example |
(Not applicable) displays |
Enter the amount of the federal tip credit.
|
Format |
999.99- |
|
Example |
Press <Enter> for .00 |
Enter the amount of the state tip credit.
|
Format |
999.99- |
|
Example |
Press <Enter> for .00 |
The fields in the Wages and Tips box enable you to specify the gross amounts for the various federal taxes calculated by the Payroll system.
The fields in the Wages and Tips box have default values calculated for them. For the default value, use the <F2> option on these fields.
The default value is calculated only if the applicable tax is defined.
The Calculated gross amount (calculated gross pay) is computed internally, based on your information for Regular pay, Overtime pay, Vacation pay, Holiday pay, Sick pay, Special pay, and any applicable permanent and temporary deductions and earnings.
Enter a gross amount for each tax category applicable to your situation. Consult with your accountant for advice on which taxes apply to your business.
Wages and Tips
Options
Enter the Gross pay amount, or use the option:
|
<F2> |
For the amount displayed in Calculated gross |
|
Format |
99999999.99- |
|
Example |
Type 1200 |
This is the amount of wages paid subject to employee withholding for social security tax.
Options
Enter the employee’s Soc sec wages amount or use the option:
|
<F2> |
For the calculated amount |
|
Format |
99999999.99- |
|
Example |
Press <Enter> for zero |
This is the amount of tips subject to employee withholding for social security tax.
Options
Enter the employee’s Soc sec tips amount or use the option:
|
<F2> |
For the calculated amount |
|
Format |
99999999.99- |
|
Example |
Press <Enter> for zero |
This is the amount of wages paid subject to employee withholding for medicare tax.
Options
Enter the employee’s Medicare wages amount or use the option:
|
F2> |
For the calculated amount |
|
Format |
99999999.99- |
|
Example |
Press <Enter> for zero |
This is the amount of tips subject to employee withholding for medicare tax.
Options
Enter the employee’s Medicare tips amount or use the option:
|
<F2> |
For the calculated amount |
|
Format |
99999999.99- |
|
Example |
Press <Enter> for zero |
Options
Enter the FWT gross amount on which federal withholding tax was calculated, or use the option:
|
<F2> |
For the calculated amount |
|
Format |
99999999.99- |
|
Example |
Press <Enter> for zero |
Options
Enter the EIC gross amount on which any EIC payment was calculated, or use the option:
|
<F2> |
For the calculated amount |
|
Format |
99999999.99- |
|
Example |
Press <Enter> for zero |
This is the amount of wages paid on which the employer’s contribution for social security tax was calculated.
Options
Enter the employee’s Empr soc sec wages amount or use the option:
|
<F2> |
For the calculated amount |
|
Format |
99999999.99- |
|
Example |
Press <Enter> for zero |
This is the amount of tips on which the employer’s contribution for social security tax was calculated.
Options
Enter the employee’s Empr soc sec tips amount or use the option:
|
<F2> |
For the calculated amount |
|
Format |
99999999.99- |
|
Example |
Press <Enter> for zero |
This is the amount of wages paid on which the employer’s contribution for medicare tax was calculated.
Options
Enter the employee’s Empr medicare wages amount or use the option:
|
<F2> |
For the calculated amount |
|
Format |
99999999.99- |
|
Example |
Press <Enter> for zero |
This is the amount of tips on which the employer’s contribution for medicare tax was calculated.
Options
Enter the employee’s Empr medicare tips amount or use the option:
|
<F2> |
For the calculated amount |
|
Format |
99999999.99- |
|
Example |
Press <Enter> for zero |
Options
Enter the FUI gross amount on which the employer’s contribution to federal unemployment insurance was calculated, or use the option:
|
<F2> |
For the calculated amount |
|
Format |
99999999.99- |
|
Example |
Press <Enter> for zero |
FUI gross is the portion of wages paid up to the maximum wages on which FUI is calculated during the year. If an adjustment will take an employee over the FUI maximum, only the amount needed to bring the employee to the maximum should be entered.
For example, if an employee has earned $6,800 and an adjustment for $400 regular pay is entered, the amount to enter for FUI gross is $200, since the limit is $7,000 for FUI.
On the other hand, FUI wages should be set to $400, since this field accumulates the total wages paid subject to FUI regardless of any maximum wage limit for FUI.
Options
As in the field above, enter the wages amount on which the employer’s contribution to federal unemployment insurance was calculated, or use the option:
|
<F2> |
For the calculated amount |
|
Format |
99999999.99- |
|
Example |
Press <Enter> for zero |
Options
Enter the amount of social security taxes withheld from the employee’s pay, or use the option:
|
<F2> |
For the calculated amount |
|
Format |
999999.99- |
|
Example |
Press <Enter> for zero |
Options
Enter the amount of medicare taxes withheld from the employee’s pay, or use the option:
|
<F2> |
For the calculated amount |
|
Format |
999999.99- |
|
Example |
Press <Enter> for zero |
Enter the federal withholding tax deducted from the employee’s pay.
|
Format |
99999999.99- |
|
Example |
Press <Enter> for zero |
Enter the amount of earned income credit (EIC) advanced to the employee.
|
Format |
999999.99- |
|
Example |
Press <Enter> for zero |
Options
Enter the amount of social security taxes paid by the employer on the earnings of this employee, or use the option:
|
<F2> |
For the calculated amount |
|
Format |
999999.99- |
|
Example |
Press <Enter> for zero |
Options
Enter the amount of medicare taxes paid by the employer on the earnings of this employee, or use the option:
|
<F2> |
For the calculated amount |
|
Format |
999999.99- |
|
Example |
Press <Enter> for zero |
Options
Enter the employer’s federal unemployment insurance (FUI) contribution for this adjustment, or use the option:
|
<F2> |
For the calculated amount |
|
Format |
999999.99- |
|
Example |
Press <Enter> for zero |
Options
Make any needed changes, or use the option:
|
<F1> |
To review the entries for the first screen |
Press <Enter> to view the third adjustment screen:
Options
Enter the amount of vacation time to accrue for this adjustment transaction or use the option.
|
<F2> |
For the default from Employees |
|
Format |
999.999- |
|
Example |
Press <Enter> |
Options
Enter the amount of sick time to accrue for this adjustment transaction or use the option.
|
<F2> |
For the default from Employees |
|
Format |
999.999- |
|
Example |
Press <Enter> |
Fields 63 through 67 allow you to specify the gross amounts for the various state and city taxes calculated by the Payroll system.
Fields 63 through 67 have default values calculated for them. For the default value, use the <F2> option on these fields.
The default value is calculated only if the applicable tax is defined.
The Calculated gross amount (calculated gross pay) is computed internally, based on your information for Regular pay, Overtime pay, Vacation pay, Holiday pay, Sick pay, Special pay, and any applicable permanent and temporary deductions and earnings.
Enter a gross amount for each tax category applicable to your situation. Consult with your accountant for advice on which taxes apply to your business.
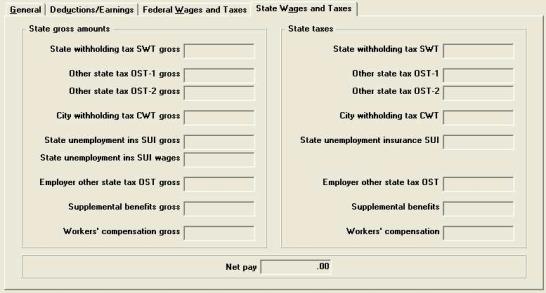
State gross amounts
State withholding tax SWT gross
Options
Enter the SWT gross amount on which the state withholding tax was calculated, or use the option:
|
<F2> |
For the calculated amount |
|
Format |
99999999.99- |
|
Example |
Press <Enter> for zero |
Options
Enter the OST-1 gross amount on which the first other state withholding tax was calculated, or use the option.
|
<F2> |
For the calculated amount |
|
Format |
99999999.99 |
|
Example |
Press <Enter> for zero |
Options
Enter the OST-2 gross amount on which the second other state withholding tax was calculated, or use the option.
|
<F2> |
For the calculated amount |
|
Format |
99999999.99 |
|
Example |
Press <Enter> for zero |
City withholding tax CWT gross
Options
Enter the CWT gross amount on which city withholding tax was calculated, or use the option:
|
<F2> |
For the calculated amount |
|
Format |
99999999.99- |
|
Example |
Press <Enter> for zero |
State unemployment ins SUI gross
Options
Enter the SUI gross amount on which the employer’s contribution to state unemployment insurance was calculated, or use the option:
|
<F2> |
For the calculated amount |
|
Format |
99999999.99- |
|
Example |
Press <Enter> for zero |
State unemployment ins SUI wages
Options
As in the field above, enter the wages amount on which the employer’s contribution to state unemployment insurance was calculated, or use the option:
|
<F2> |
For the calculated gross |
|
Format |
99999999.99- |
|
Example |
Press <Enter> for zero |
|
Note |
The information regarding FUI above also applies to SUI gross and SUI wages entered in these two fields. |
Employer other state tax OST gross
Options
Enter the Employer OST gross amount on which employer OST is calculated, or use the option:
|
<F2> |
For the calculated amount |
|
Format |
99999999.99- |
|
Example |
Press <Enter> for zero |
Options
Enter the Supplemental benefits gross amount on which supplemental benefit contributions are calculated, or use the option:
|
<F2> |
For the calculated amount |
|
Format |
99999999.99- |
|
Example |
Press <Enter> for zero |
Options
Enter the Workers' compensation gross amount on which the employer’s contribution to workers’ compensation is calculated, or use the option:
|
<F2> |
For the calculated amount |
|
Format |
99999999.99- |
|
Example |
Press <Enter> for zero |
State taxes
Enter the amount of state withholding tax (SWT) deducted from the employee’s pay.
|
Format |
999999.99- |
|
Example |
Press <Enter> for zero |
Options
Enter the amount of other state tax #1 (OST-1) deducted from the employee’s pay, or use the option:
|
<F2> |
For the calculated amount |
|
Format |
999999.99- |
|
Example |
Press <Enter> for zero |
Options
Enter the amount of other state tax #2 (OST-2) deducted from the employee’s pay, or use the option:
|
<F2> |
For the calculated amount |
|
Format |
999999.99- |
|
Example |
Press <Enter> for zero |
Enter the amount of city withholding tax (CWT) deducted from the employee’s pay.
|
Format |
999999.99- |
|
Example |
Press <Enter> for zero |
State unemployment insurance SUI
Options
Enter the employer’s state unemployment insurance (SUI) contribution for this adjustment, or use the option:
|
<F2> |
For the calculated amount |
|
Format |
999999.99- |
|
Example |
Press <Enter> for zero |
Options
Enter the amount of employer paid other state tax (Empr OST), or use the option:
|
<F2> |
For the calculated amount |
|
Format |
999999.99- |
|
Example |
Press <Enter> for zero |
Options
Enter the amount of supplemental benefits for which the employer is liable as a result of this adjustment, or use the option:
|
<F2> |
For the calculated amount |
|
Format |
999999.99- |
|
Example |
Press <Enter> for zero |
Options
Enter the amount of the workers’ compensation premium for this adjustment, or use the option:
|
<F2> |
For the calculated amount |
|
Format |
999999.99- |
|
Example |
Press <Enter> for zero |
Options
Enter the amount of net pay paid to this employee, or use the option:
|
<F2> |
For the calculated amount |
|
Format |
99999999.99- |
|
Example |
Type 2500 |
Two conditions can prevent you from proceeding:
| • | The net pay is not zero, and yet no check number was given in the Check # field. |
| • | The net pay as entered does not agree with that calculated. |
In both cases, an error message will explain the problem, and you can back up to the previous screens to correct the error. It may help to see how the net pay is computed:
|
Net pay = |
Regular Pay |
|
|
|
+ Overtime Pay |
- Union Deduction |
|
|
+ Special pay |
- Loan Deduction |
|
|
+ Vacation Pay |
- Garnish Deduction |
|
|
+ Holiday Pay |
- Permanent Deductions |
|
|
+ Sick Pay |
- Other Deductions |
|
|
+ Advance EIC paid |
- Social security |
|
|
+ Permanent Earnings |
- Medicare |
|
|
+ Other Earnings (not including Tips and Meals) |
- FWT |
|
|
|
- SWT |
|
|
|
- OST#1 |
|
|
|
- OST#2 |
|
|
|
- CWT |
Options
Make any needed changes, or use the option:
|
<F1> |
To review the entries for the second screen |
Press <Enter> to view the distribution screen.
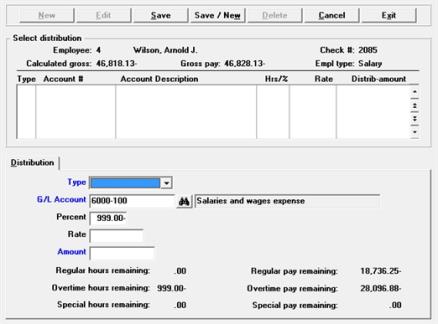
Adjustment transactions are distributed to General Ledger for regular hours and pay, overtime hours and pay, and special hours and pay.
The distribution screens in this selection are essentially the same as those for Time worked. The only significant difference is that Adjustments lets you manipulate the hours and the dollar amounts independently of one another (and requires both to balance before letting you exit the screen).
Whether or not you enter manual distributions to General Ledger is determined by how you have set up your Payroll system.
When setting up Payroll, the system should be put into setup mode by selecting a check mark (Yes) to the field PR is in setup mode in Control information. In this case, entry of manual distributions is always skipped, and posting of G/L distributions does not occur.
After setup, the system should be taken out of setup mode by un-checking the box to the above question.
Once this is done, manual distributions can be entered for an employee’s payroll adjustments depending upon the answer to the field Distribute wages in Control information.
| • | If this field is answered Never, manual distributions are never entered. |
| • | If this field is answered Always, manual distributions are always entered. |
| • | If this field is answered Selectively, entry of distributions depends upon how the field Distribute wages is answered for an employee in the employee’s record. |
If this question is unchecked for an employee, distributions are not entered for that employee.
If this question is checked for an employee, distributions are entered for that employee.
Distributions can be entered for Job Cost only when manual distributions to General Ledger are being entered.
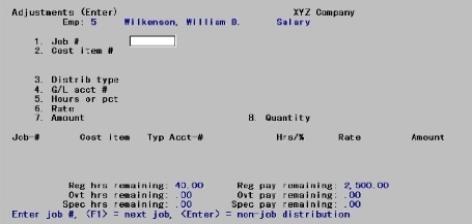
In the case of employee 5, the answer to the Distribute wages (manually) field in Employees is check marked (Yes), and you are not interfaced with Job Cost in this example, so the screen for entering G/L distributions is displayed, as follows:
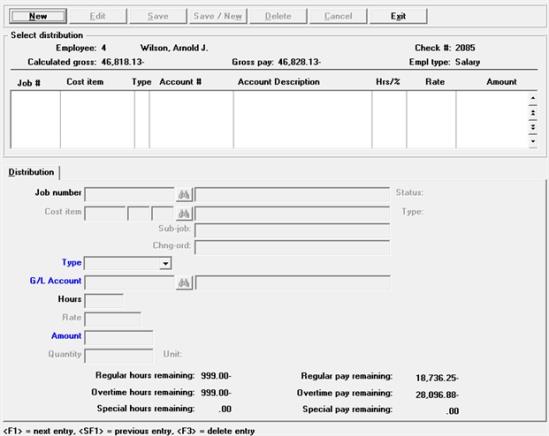
Graphical Mode
The list box displays several existing distributions at a time.
To locate an distribution, you may also use the up/down arrows, Page up, Page down, Home and End keys.
Distributions that display in the list box are available for changes or deletion. The fields for the selected distribution display in the lower part of the screen.
When an distribution is found, you may select the <Enter> key or Edit button to start editing.
You may select a button for editing, deleting or adding a new distribution:
| Button | Keyboard | Description |
|
New |
Alt+n |
To enter a new distribution |
|
Delete |
Alt+d |
To delete the distribution selected in the list box |
|
Edit |
Alt+e |
To edit the distribution selected in the list box |
|
Save |
Alt+s |
To save a new distribution or changes to an edited distribution |
|
Save/New |
Alt+w |
Same as Save button plus the New button |
|
Cancel |
Alt+c |
To cancel adding or editing an distribution |
|
Exit |
Alt+x |
To exit the screen. You may also use the <Esc> key |
Character Mode
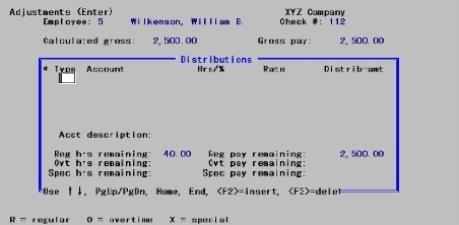
Enter the distribution information for this screen as follows:
For a new distribution
This is the distribution type, which refers to the type of hours or pay being distributed on this line.
The choices displayed at the bottom of the screen are divided into two groups of employees:
| • | Hourly employees, or salaried employees with non-zero regular hours |
| • | Salaried employees with regular hours that are not equal to zero |
Options for hourly employees are:
|
R |
Regular |
|
O |
Overtime |
|
X |
Special |
Options for salaried employees are:
|
S |
Salaried |
|
O |
Overtime |
|
X |
Special |
Enter the distribution type or use the option:
|
<Enter> |
For the type of the previous distribution entered |
|
Example |
Type R |
For an existing distribution
Options
Enter the key fields Type and Account for the distribution you want to change, or use the option:
|
<F1> |
To scan through existing distributions |
Make any changes. You are not allowed to change the key fields.
This is the number of the G/L account to which the number of hours or the percent of pay specified on this line is to be distributed.
Options
Enter the account number or use the option:
|
<F2> |
For the wage account number for this employee in Employees |
|
Example |
Type 6000 and then type 200 |
Options
If the employee is specified as hourly in Employees, or is specified as salary but Regular hrs is non-zero, enter the number of hours to be distributed to the account entered on this distribution line. If the employee is salaried and Regular hrs is zero, enter the percent of the salary (regular pay) to be distributed to the account number entered on this line. Overtime and special hours are distributed on an hourly basis, even for a salaried employee.
|
<F2> |
To distribute all of the remaining hours to this account |
|
Format |
999.99- (hours) 999.99 (percentage) |
|
Example |
Press <F2> |
The Hours field for distribution types R, O, and X can be skipped if you are distributing only an amount, not hours. The rate and amount fields can be skipped if you are distributing only hours.
For a salaried employee, the Rate column is skipped.
This is the rate of pay that is multiplied by the Hours entered to determine the amount of this distribution.
Options
Enter the rate of pay or use the option:
|
<F2> |
For the employee’s hourly rate (regular, overtime, or special, as entered in Employees) |
|
Format |
99999.999- |
|
Example |
Press <F2> to use this employee’s regular pay rate. (The regular rate is selected because R is entered as the TYPE on this distribution line.) |
If the employee whose pay is being distributed is salaried, the Amount field is skipped for an S (salary) type distribution line.
Options
This is the amount of pay for this distribution line. For an hourly employee, enter the amount or use the option:
|
<F2> |
To use an Amount equal to the number of hours times the rate. |
For overtime (O) and special (X) distributions, the calculations are made in terms of the number of overtime or special hours times the appropriate rate (overtime or special).
The dollar amount entered for a particular distribution does not have to equal the hours times the rate entered. Hours and dollars can be distributed independently, providing extreme flexibility in making adjustments to quantities in various payroll files or tables.
|
Format |
99999999.99- |
|
Example |
Type 2500 |
If you want to delete the distribution, press <Esc>. You can then re-enter the entire distribution line.
With all 48 hours of the regular hours distributed, the Reg hrs remaining at the bottom of the screen shows zero, so you can exit from the distribution of this adjustment.
If Job Cost is used
|
Note |
If you are not using Job Cost, skip this section. |
If you are interfacing to Job Cost in the previous case, the following screen displays for distribution to G/L accounts or jobs, rather than the previous distribution screen that was shown.
Graphical Mode
Job Cost Distributions List Box
The list box displays up to 6 existing distributions at a time. You may sort the distributions by job number in ascending or descending order. Only columns with red labels may be sorted. Click the field label or arrow to the right of the column name to change the sort or use the View menu options.
To locate a distribution, start typing the job number. You may also use the up/down arrows, Page up, Page down, Home and End keys to locate a distribution.
Distributions that display in the list box are available for changes or deletion. The fields for the selected distribution display in the lower part of the screen.
When a distribution is found, you may select the <Enter> key or Edit button to start editing.
You may select a button for editing, deleting or adding a new job cost distribution:
| Button | Keyboard | Description |
|
New |
Alt+n |
To enter a new distribution |
|
Delete |
Alt+d |
To delete the distribution selected in the list box |
|
Edit |
Alt+e |
To edit the distribution selected in the list box |
|
Save |
Alt+s |
To save a new distribution or changes to an edited distribution |
|
Save/New |
Alt+w |
Same as Save button plus the New button |
|
Cancel |
Alt+c |
To cancel adding or editing an distribution |
|
Exit |
Alt+x |
To exit the screen. You may also use the <Esc> key |
Character Mode
Enter the distribution information as follows:
For a new distribution
If this distribution is for a job, this is the job number. The job must be on file and its status must be active. The job description and status display automatically upon entry of the job number.
Options
Enter the job number, or use one of the options:
|
<F1> |
To scan through active jobs |
|
Blank |
For a non-job distribution. The cursor moves to the distribution Type field. |
|
Format |
Seven characters. The last job number entered (if any) displays as the default. |
|
Example |
(Does not occur in this example because not using Job Cost) |
Options
Enter the cost item. This must be on file for the job, and it must be a labor type cost item. The cost item description is displayed automatically. You can use the option:
|
<F1> |
To scan through labor cost items for the job |
|
Format |
Seven characters (category) 999 (sub-job; not present in all cases) 999 (change order; not present in all cases) |
|
Example |
(Does not occur in this example because not using Job Cost) |
This is the distribution type, which refers to the type of hours or pay being distributed on this line.
The choices displayed at the bottom of the screen are divided into two groups of employees:
| • | Hourly employees, or salaried employees with non-zero regular hours |
| • | Salaried employees with regular hours that are not equal to zero |
Options for hourly employees are:
|
Regular |
|
Overtime |
|
Special |
Options for salaried employees are:
|
Salaried |
|
Overtime |
|
Special |
Enter the distribution type or use the option:
|
<Enter> |
For the last distribution type entered |
|
Format |
One option from the list above. |
|
Example |
(Does not occur in this example because not using Job Cost) |
This is the number of the G/L account to which the number of hours or the percentage of pay is distributed.
Options
Enter the account number or use the option:
|
<F1> |
For the cost account for the cost item (if for a job) |
|
|
For the wage account number for this employee in Employees (if not for a job) |
|
Format |
Your standard account number format, as defined in Company information |
|
Example |
(Does not occur in this example because not using Job Cost) |
If the employee is specified as hourly in Employees, or is specified as salary but Regular hrs is non-zero, enter the number of hours to be distributed.
If the employee is salaried and Regular hrs equal zero, enter the percent of the salary (regular pay) distributed.
Overtime and special hours are distributed on an hourly basis, even for a salaried employee.
|
Format |
999.99- |
|
Example |
(Does not occur in this example because not using Job Cost) |
For a salaried employee, the RATE field is skipped.
This is the rate of pay that is multiplied by the HOURS entered to determine the amount for this distribution.
Enter the rate of pay or use the option:
|
<F2> |
For the employee’s hourly rate (regular, overtime, or special, depending on the distribution Type for this distribution). The rate is obtained from Employees |
|
Format |
99999.999- |
|
Example |
(Does not occur in this example because not using Job Cost) |
If the employee whose pay is being distributed is salaried, the Amount field is skipped for an Salary type distribution.
Options
This is the amount of pay for this distribution. For an hourly employee, enter the amount or use the option:
|
<F2> |
For an amount equal to the number of hours times the rate |
|
Format |
99999999.99- |
|
Example |
(Does not occur in this example because not using Job Cost) |
For overtime (O) and special (X) distributions, the calculations are made in terms of number of overtime or special hours, times the appropriate rate (overtime or special).
The dollar amount entered for a particular distribution does not have to equal the hours times the rate entered. Hours and dollars can be distributed independently, providing extreme flexibility in making adjustments to amounts and hours in various payroll files.
If this is a distribution for a job and there is a unit (other than hours) associated with the cost item entered above, enter the quantity of this unit for this distribution.
|
Note |
If this is not a distribution for a job or there is no unit associated with the cost item, this field is skipped. |
|
Format |
9999999.9- |
|
Example |
(Does not occur in this example because not using Job Cost) |
Make any desired changes.
When you press <Enter>, the distribution is filed and displayed at the bottom of the screen, and the remaining hours and amounts displayed on the screen are updated as appropriate.
You can now enter another distribution for this adjustment.
You are not allowed to exit entering distributions until all amounts remaining as shown on the screen are zero.
The section below explains how to print an edit list of adjustments from the Reports menu, and how to post adjustments.
Select
Edit list from the Adjustments menu, or Adjustments edit list from the Reports menu.
Also, from the Adjustments (Enter) screen you may select Print > Edit list.
Check the adjustments on the edit list to see if they are correct and to determine if they are ready for posting. Except for the title, the edit list has exactly the same format as the Payroll Adjustments Register.
After you have examined the edit list and you are sure that the adjustments are correct, you can post them.
Select
Post from the Adjustments menu.
Also, from the Adjustments (Enter) screen you may select Options > Post.
All distributions are posted to Payroll Distributions.
|
Note |
If any inapplicable adjustment was made (such as a CWT amount for an employee without an associated city tax code), the distribution is posted to an undefined account. |
When the posting of distributions is complete, the adjustment amounts are posted to the employee’s record in Employees.
Any vacation or sick hours entered for the employee are subtracted from his vacation or sick hours due, and vacation hours are added to his vacation hours paid amount in Employees.
Vacation and sick hours accrued are added to vacation and sick hours due.
The adjustments are also posted to Adjustment History, Payroll History, Payroll QTD History, Payroll YTD History, and YTD State and City History. If Job Cost is installed job details (costs) may also be updated.
Interface to Check Reconciliation
Per the Check Reconciliation Control information you may be setup to automatically post to the C/R Check Book (CKBOOK). When you are automatically posting to Check Reconciliation, the Ajustments Register will include this message:
*** Transferred to Check Reconciliation ***
If you are not setup to automatically post, you must run the Transfer checks\deposits function on the C/R menu to pull the data into Check Reconciliation.
Whether the system is auto-posting or you are transferring manually, the cash account used must be setup as a checking account in C/R in order to interface to C/R.
When the ACH file is fully processed using the Direct Deposit system, the payment amount is in transit to the employee’s account, or has already been deposited in the employee’s account you have the following options:
| • | The net pay and taxes must be adjusted on the next payment run or |
| • | The employee must reimburse the company for the amount deposited. |
Assuming that the journal entries for the cash account and direct deposit account have been made for the total amount directly deposited, as described above, the amount reimbursed is entered as a General Journal transaction with a debit to the cash account and a credit to the direct deposit account. If A/R is in use, instead of using General Journal, enter a non-A/R cash receipt for the cash account, distributing the direct deposit amount to the direct deposit account.